Tuesday, October 23, 2012

A flop-free first!

Last night night the planets must have been aligned  because things went beautifully at the studio!  My clay was finally not too wet or to hard, I was centering well, and I threw 4 beer steins...<dramatic pause>...without flopping anything!  First time ever for me.

I also got out of the studio on time, at a decent hour.  Whacky.  And, I managed to get all four wet steins home in the car without destroying them.


That being said, while I managed to get the size of stein I wanted out of the amount of clay I started with, I still haven't figured out how to duplicate identical shapes in this form.  Still something to work on.  Also, 4 steins in 2 hours is still pretty painfully slow. But I've definitely walked away from studio nights before with no good pots before.  So, I'll take this and be thrilled with it!


Tuesday, October 16, 2012

The dread glazing night

As new folks start classes at the studio, one of the first questions is always, "How long have you been doing this?"  This is a difficult question for me to answer--one semester in college (more than 15 years ago), a few months (several years ago), and the last year.  Hmmm...17 years?  2 years?

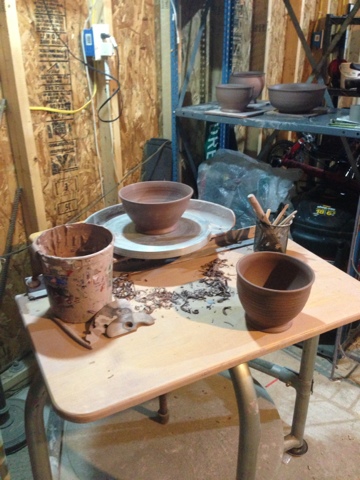
Earlier this year, I made a conscious decision to devote more time & energy into my pottering hobby.  For the last 6 months or so, I decided that it was time to spend more than just class time in the studio.  I try to get to open studio at least one other time during the week (and then find myself staying there ridiculously late).  I finally got my own wheel at home and set up my little garage studio.  I try work from home whenever I can find a spare hour or so.  I aim to work at improving the form of everything I throw and convince myself to squash that pots that come out meh, instead of keeping them just because they came out upright.  

There's still plenty to work on in the pottery learning curve for me.  Tons, in fact.  And glazing is one of the big ones.  Although I'm not producing crazy amounts of pots, I'm feeling pretty satisfied with how many more things I've made in the last few months.  But producing more pots has its dark side--so many more things to glaze!  Eek!  All I did last night at the studio was glazing.  Blech!

It seems that many potters have a love/hate relationship with glazing.  It might be because it's the last stage in the process.  Get yourself to the wheel, throw pot, flop the pot. Repeat.  Finally throw a pot that looks good, maybe even one that you love.  Manage to let the pot dry to leather hard and then trim without screwing it up.  Don't accidentally break the beautifully trimmed pot as you put it on the shelf--true story, just happened to me last week.  Sigh.  Get it to bone dry without cracks appearing.  Get it through the bisque firing without any (major) cracks appearing.   All the while, I always manage to ignore the pile of pots that are gathering on my shelf, just begging for those final steps in the process.  

Maybe it's all the decisions that makes glazing so angst-filled for me.
"What color do I want?"
"How will these colors look layered?"
"Did I put too much on, is this all going to run off?"
And then deciding between dipping pieces in the studio glazes (quicker) or brushing on my small stash of bottled glazes (more options,  but more time consuming). And managing not to touch the glazed piece before it's totally dry (because it's now after midnight and I have to work in the morning) and screwing it all up. 

Maddening.  

A few weeks ago, before the studio gallery opening, I had the great joy of being at the studio when both of the kilns were about to be unloaded from a glaze firing.  Lots of the studio members were hovering around the kilns, watching the temperature readings drop to the level when it could be unloaded--so similar to the watched pot that never boils!  And when it could be finally unloaded, listening to Greg hoot with delight as he unloaded some of his pieces with "experimental" glazing that turned out beautifully. It was awesome.

However, there are the disappointments of the beautiful colors of a bowl that ended up having weird bubbly holes marring the finish of the glaze for unknown reasons.  Or the layering of colors that turned out nothing at all as expected...and not in a good happy way.

Totally maddening!

But also pretty satisfying.


For goodness sakes, the whole point of this post was to talk about keeping a glaze journal!  Or how frustrating it can be to not keep one!  For the last month, I've been try REALLY hard to note all the glaze combinations that I've been trying on my pots. I figured out that the easiest way to make this happen consistently, is to use my iPhone.  I've long been sold on the awesome of the Evernote app.  It rocks.  (I will note its only big flaw in the footnote.) 

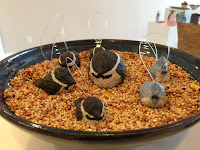
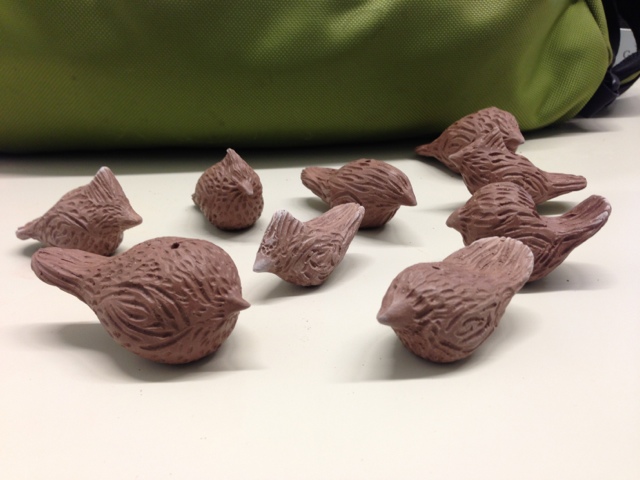
Testing Glazes with the birdies!
I have set up a pottery notebook in Evernote.  When I glaze a pot, I grab my phone, create a new note with the details of the glazes and application, snap a photo of it before it's fired, and then one more photo after it comes out of the kiln.  If the glazing fired miserably, I also record what may have gone wrong and additional notes if I'm reglazing/refiring. Bingobango, this takes all of about 30 seconds per pot at most and I always have my phone handy.

So far, this has rocked!  It's well worth a try if you have a smartphone.  And as I was surfing the web for some ideas for this post, I found out that other folks are just as smart as me by using this Evernote for pottery journaling  Go figure.

**My big quibble with Evernote is the offline functionality.  Don't get me wrong, I'm using the free app version, and it's pretty awesome.  But you must have wifi or cell service to grab your notes from the cloud.  If you become a subscriber (which gets you that offline functionality) it costs $5.00 per month or $45.00 per year.  Which is a little steep for me.  Sigh.  That being said, Evernote still rocks.  For this and I especially love it for recipes.

Wednesday, October 10, 2012

A chilly, mostly clean, new little studio

A few months ago, I found a Skutt kick wheel on eBay. Doug & I drove over to Clay City (appropriate, eh?) to pick up my very own wheel!

Since there really isn't a good space for it in the house, my studio space needed to be out in the garage. After setting up the wheel, I tried it out a few times, but the usual utter chaos in the garage was crazy distracting.

Yesterday, I finally finished creating some semblance of order and rearranged to have enough space for the wheel, wedging table, and some empty shelves.

And so, the home pottering begins...just in time for winter.  <Brrrrr>


Sunday, October 7, 2012

Pottery Show


Yesterday was the first pottery show I was invited to submit work to.  So exciting!!  It was at the gallery at the front of the Beech Grove Clay Works studio.  It was a great gathering--lots of visitors and many beautiful pieces by about a half dozen members of the studio.  Here's a few shots from the show--and since it's my blog, focusing mostly on my stuff!


Member of the studio also brought tasty libations and some delicious food, including bacon mini-cupcakes. Shockingly pleasant!

For the folks who requested the recipe for the homemade onion dip I brought....


Pan-Fried Onion Dip
Originally from The Barefoot Contessa Cookbook
Ingredients
2 large yellow onions
4 tablespoons unsalted butter
1/4 cup vegetable oil
1/4 teaspoon ground cayenne pepper
1 teaspoon kosher salt
1/2 teaspoon freshly ground black pepper
4 ounces cream cheese, at room temperature
1/2 cup sour cream
1/2 cup good mayonnaise
Directions
Cut the onions in half and then slice them into 1/8-inch thick half-rounds. (You will have about 3 cups of onions.) Heat the butter and oil in a large saute pan over medium heat. Add the onions, cayenne, salt, and pepper and saute for 10 minutes. Reduce the heat to medium-low and cook, stirring occasionally, for 20 more minutes until the onions are browned and caramelized. Allow the onions to cool.

Place the cream cheese, sour cream and mayonnaise in the bowl of an electric mixer fitted with the paddle attachment and beat until smooth. Add the onions and mix well. Taste for seasonings. Serve at room temperature.
~~~~~~~~~~~~~~~~~~~~~~~~~~~~~~~~~~~~~~~~~~~
What Fiona actually did:
3 medium onions
lesser amounts of oil and butter
1 container of sour cream
1 block of softened cream cheese
skipped the mayonnaise entirely
salt, pepper, and garlic powder, chipotle chili powder (in place of cayenne) to level of flavour that seemed tasty
With the cream cheese softened, hand blending seemed enough without using mixer.


Tuesday, October 2, 2012

Birdies!

Last fall when I came back to the studio after a few year hiatus, the instructor, Lori Leaumont taught me how to make these awesome little pinch pot birds. Best 10 minute pottery project ever!!

Pinch pots are simple hand-built pottery forms. They all start with a ball of clay and beginning with pressing a thumb into the ball, you can pinch the clay into a variety of different shapes, cups, bowls, or in this case, birds. Since the shaping on these birds actually creates a hollow in the center, a small ball of crumpled paper is inserted before closing the form to keep the shape from collapsing in on itself.  During firing, the heat of the kiln magically burns away to nothing.

As I shaped my first bird, I immediately decided that Carolina Wrens had a shape that suited these little guys.  The whole first batch of these ended up being wrens and a few cardinals.  I started out doing fairly faint, simple textures on all of the birds, just using a needle tool.  As I've progressed with the birdies, I've discovered that I can use a small loop tool to trim the texture in a little deeper to mimic feathers and the shape of wings.  I've also started to focus on a few other Indiana birds that suit this form, chickadee, tufted titmouse, and kingfisher. 

Although I'd planned to do simple dip glazes on these birdies, their shapes turned out so well that I was foolishly inspired to handpaint them with underglazes.  I'm still learning a lot about glazing, especially using underglazes.  I was pleasantly surprised to find out that if I was willing to leave these birds with only with a matte finish--just the underglaze without a coat of glossy clear glaze--then I could color the whole body of the birds including the bottom, without having to stilt up each bird from the shelves of the kiln. 

Unfortunately, hand painting the birds is a lot more time consuming than simple dip glazing.  But, the end result on the birdies turned out so appealing that I'll probably be stuck handpainting future little guys as well.


Monday, October 1, 2012

Improving forms


For the last few months, I've been obsessing a bit on making beer steins.  Really trying to use best amount of clay for the proper--in my mind, pint sized--sized stein. Also, trying to improve on handle style and placement.  I'm also starting my attempt to repeat throw.  I haven't quite made it there yet, but they are getting pretty similar in size and shape now!

How this obsession with pottery all started...

Way back a million years ago, I was able to squeeze in a wheel throwing class in my last semester as an undergrad.  And I loved it!  I still have a few of the pieces that I threw back then, a really heavy mug with a ridiculously big handle, a few bottles, and one vase that had a shape that I loved despite its horrible glaze.

After that first class, life was crazy and active for many years.  A very crunchy granola graduate school that involved traveling around the US and camping out every night, counting fish on Alaskan fishing boats, working seasonally at nature preserves, and finally moving to a new city to settle into a new career.  None of those endeavors was really conducive to getting back into pottery.  But after life finally settled down, and my budget could finally afford a line for pottery classes, I finally got back to the wheel.

I was lucky enough to find Beech Grove Clay Works, a great little studio in a small city on the south side of Indianapolis.  The studio is just 10 minutes away from my house, the classes are pretty affordable, the open studio time is incredibly generous, and the folks in the studio are just great!  When I got to start classes, I was pretty thrilled to find that my centering skills, although rusty, still existed.  Over the course of the class and a summer of open studios, I was able to create some passable bowls, mugs and my first lidded form! Although I still wished for better forms and lighter pieces, I was making progress.

Life again got in the way of pottery for a few years--planning a wedding, travelling lots, and getting used to life with my awesome hubby took precedence for a while.  But this break finally ended last year, I'm finally getting to focus on improving as a potter.  Beech Grove Clay Works also has made some changes, moving to a bigger location, adding a gallery, and gaining some great new instructors.

Just one photo for this post...a blast from the past.  This vase is one of the pieces I've kept from my first pottery class.  It's undergone a make-over with a re-glazing.  Originally this vase was supposed to have a lovely glowy light blue glaze.  Unfortunately, the originally application was too light.  I held on to it all these years, loving the shape but hating the glaze.  Last week I took a chance, and it came through its refiring with lovely new colors!  Potter's Choice Vert Lustre over Blue Midnight.